.

Soft and Chewy Snickerdoodles

Soft, chewy and full of cinnamon goodness, these cookies are perfect for Christmas!

Gingerbread

Gingerbread is one of those quintessential Christmas sweet treats. This one is flavorful and a cinch to bake up.

No-Fail Sugar Cookies with Royal Icing

This recipe makes great cut-out sugar cookies, and the royal icing is perfect for decorating.

Eggnog Cookies

Soft and cakey cookies with the perfect amount of nutmeg and all the flavor of eggnog.

Nutella Hot Chocolate

This recipe is sinfully simple, full of the flavor of Nutella and can be prepared in the microwave (or on the stovetop) in minutes.

Tuesday, November 27, 2012

Ole Ole - Rice Cooker Mexican Rice

Yesterday I shared with you my recipe for Taco Pie and hinted at my love for restaurant style Mexican rice. I have tried unsuccessfully to recreate it at home, and although none of the recipes I've tried have been inedible, they just haven't hit the mark. Usually they've been too saucy or too strong on the tomato flavor. The rice I love has a sprinkling of corn and diced yellow onions with a faintly reddish orange color, and is definitely not saucy in the least. So, I decided to do a little experimenting and as luck would have it I hit it pretty close to the mark my first go round.

I originally planned to make some white rice in my rice cooker and figured while I was at it, I'd add a few other ingredients and hope for the best. Not only did it turn out to be enjoyable, I found myself craving the leftovers for lunch a few days later. I had a little bit of the black beans leftover that I dished up with the Taco Pie, so I drained and rinsed those and added them to the rice before reheating and discovered a wonderful, light and healthy meatless lunch idea.

From Roots And Renovations

Rice Cooker Mexican Rice

Ingredients

  • 1 cup long grain rice, uncooked
  • 2 1/4 cup water
  • half small yellow onion, diced
  • 1 cup canned or frozen cooked corn
  • 1/3 cup salsa
  • 1 tablespoon butter or margarine
  • 1/2 teaspoon salt

Cooking Directions

  1. Add all ingredients to rice cooker, stir.
  2. Close lid, and turn on. Depending on the rice cooker you will either push the on button or select the white rice setting.
  3. Cook according to the long grain white rice instructions included with your rice cooker, stirring occasionally.
  4. Once cooked, serve immediately or turn the rice cooker to the warm setting and leave covered, stirring occasionally.

Monday, November 26, 2012

Mexican Monday - Taco Pie

Around here we love Mexican food. The flavors are robust yet simple, and just so fresh. Even though we love it, we don't eat it frequently and when we do we keep it simple, tacos, nachos, black beans, and occasionally I'll make quesadillas, or enchiladas. Those last two are rarities though because Picky Eater isn't a huge fan of flour tortillas. Me? I love 'em! I'll eat them straight from the package, or slathered with some Land O Lakes Cinnamon Sugar Butter, which by the way is AMAZING!

From Roots And Renovations

Recently, I had a craving for Mexican so I decided to make Taco Pie, a super easy casserole style Mexican dish, with one of my favorite ingredients, crescent rolls! The base of this dish is a pre-baked crescent roll layer topped with taco seasoned ground beef and some other goodies. I've been making this dish for a while, and have adapted the original recipe to suit our tastes. I think my kicked up version is even better if I do say so myself.

This recipe can easily be modified to suit your family's tastes, or even doubled to feed a larger family than my little one. I haven't tried this with anything other than ground beef, but I'm sure it would be great with shredded chicken as well.

From Roots And Renovations

When I go to a Mexican restaurant one of my favorite parts of the meal is the rice, and I've tried several different recipes in an attempt to have the same deliciousness at home. I've never had any complete failures, but no recipe I've tried has come close until now! I have finally come up with my own version of restaurant style Mexican rice, and it's super easy. Stay tuned tomorrow for my Rice Cooker Restaurant Style Mexican Rice!

Taco Pie

Ingredients

  • 1 tube (8 count) Crescent Rolls
  • 1 lb ground beef
  • 1 (1 oz) package taco seasoning
  • 1 can diced tomatoes with green chiles, drained
  • 1/2 can mexicorn, drained
  • 2 cups crushed tortilla chips
  • 1 cup shredded cheddar cheese, or Mexican cheese blend

Cooking Directions

  1. Preheat oven to 350 degrees.
  2. Spray 9x9 glass baking dish with non-stick cooking spray and lay crescent dough flat on bottom of pan. Bake according to package directions.
  3. Brown ground beef over medium high heat. Drain grease and return to skillet. Add taco seasoning package and cook according to packet directions.
  4. When crescent dough is fully pour meat mixture over top, and spread evenly.
  5. Layer remaining ingredients in the following order: diced tomatoes with green chiles, mexicorn, crushed tortilla chips, followed by shredded cheese.
  6. Bake at 350 degrees for 10 minutes. or until cheese is melted.
  7. Optional: top with sour cream and shredded lettace

Monday, November 12, 2012

Warm Your Bones, Satisfying Soup - Chunky Potato Soup

From Roots And Renovations
I have probably said this before and I will probably say it again, I am not, absolutely not a fan of cold weather. Have you heard of seasonal affective disorder, also sometimes known as the winter blues? Yeah, I think I have that. No seriously, I sometimes wonder if I really do have that. I even looked up the symptoms, and while I don't suffer the classic symptoms: oversleeping, overeating, decreased appetite, when the weather falls below 70 and the days are mostly gray and dreary I get the blahs.

I don't claim to live a terribly exciting life, and for the most part, season to season my routine doesn't change much. But, once the temperature dips life seems to get boring, which is probably because I like to stay inside where it's warm and I guess you could say I start to withdraw a bit. There are few things I enjoy about the fall and winter months. I do enjoy Thanksgiving and Christmas, most especially the baking and eating associated with the two. As I've mentioned previously, I enjoy all things pumpkin spice. Another thing I enjoy is making soup, which of course you can do year round, but it just seems so much better and more enjoyable when the weather is cool enough that you need a stick to your bones, warm you up meal.

With Mr. Picky Eater to feed I tend to stick with a few tried and true soups: vegetable beef, chili (with beans of course), chicken noodle vegetable and beef stew. I like trying different things and occasionally, I can get him to go along and every once in a while he will even admit to enjoying my experiments. One such experiment was my recent creation, Chunky Potato Soup. I've tried several different recipes in the past and although none were a disaster they weren't anything I was dying to make again. After looking at quite a few different recipes for inspiration I came up with my own simple and hearty version that will satisfy even a picky eater.

The verdict is that this soup is definitely worth making again. Unfortunately, I'm afraid my photo doesn't do it justice. Sorry about that!

Chunky Potato Soup

Recipe by Ms. Roots and Renovations

A hearty, chunky potato soup perfect for a cool day. Minimal effort with satisfying result, to warm your bones and fill your belly.

Prep time: 10 minutes

Cook time: 25 minutes

Total time: 35 minutes

Yield: 3 generous servings or if serving with a salad or sandwich 6 small servings

Ingredients

  • 1/4-1/2 medium yellow onion (adjust amount to suit your taste)
  • 1/2 package (16 oz) frozen hashbrowns (such as Ore Ida)
  • 16 oz chicken broth (vegetable broth would work too)
  • 1 1/4 cup milk (preferrably 2% or whole) or mixture of milk & half and half
  • 1/4 cup all purpose flour
  • 1 tablespoon butter or margarine
  • salt and pepper to taste
  • 6 slices cooked bacon, crumbled
  • 1 cup grated cheddar cheese (I prefer extra sharp cheddar)

Cooking Directions

  1. Saute diced onion in butter/margarine until translucent.
  2. In microwave, thaw hashbrowns about 1 minute, then pour into a colander and rinse with warm water (to remove any ice chunks/freezer fur).
  3. Add rinsed hashbrowns and broth to sauteed onions. Bring to simmer and cook for 10 minutes, stirring frequently to prevent potatoes from sticking to the bottom of the pot.
  4. Add milk or mixture of milk and half and half to pot, heat over medium, until hot, about 10 minutes, stirring frequently.
  5. Once hot, add crumbled bacon and grated cheese, stir until cheese is completely melted into soup.
  6. Add salt and pepper to taste.
  7. Serve immediately, topping with additional crumbled bacon, grated cheese, and sliced green onions if desired.

Thursday, November 8, 2012

Showing Support and Serving Up Comfort Food - Deviled Eggs

I'm writing this with our neighbors in the Northeast, the victims of Hurricane Sandy, in mind. Food bloggers around the country have set aside today as our day to honor and support those who have been suffering and enduring the craziness of Hurricane Sandy.


My aunt and uncle planned a quick little get away to NYC last weekend, and despite the aftereffects of Hurricane Sandy they went anyway. I am sure they saw a lot of upset and things that were still not back in order for the Big Apple, but in hearing their recap of the trip it sounds like much of the city has bounced back and gotten on their feet again relatively well. But, looks can be deceiving, and when it comes to the aftermath and rebuilding from a hurricane I speak from experience. I was 8 years old when Hurricane Hugo took a very unexpected turn and hit my hometown of Charlotte on September 22, 1989. To say we were shocked and unprepared is an understatement. The entire city ground to a halt. We were hit in the middle of the night and miraculously my little body slept through the entire thing. I awoke to find we had no power, no running water because we used a well, trees were downed all around our house, including on one of our cars. At the time, we lived in a heavily wooded area on a gravel road and literally had to cut our way out to civilization. We experienced gas shortages, and long waits for groceries, much like the victims of Hurricane Sandy have had to endure. And because we lived on a little gravel road we were without power and running water for 14 days.

The experience was scary and surreal, but nothing compared to what some have endured at Hurricane Sandy's wrath. I thank the Lord we didn't experience flooding and no snowstorm or incredibly cold weather as we picked up the pieces. There are still many people without power, without homes and worst of all, dealing with the tragic loss of loved ones. There are victims that are in need of so much right now, and since I can do nothing else, I pay tribute, send out positive thoughts and well wishes.

I am not only honoring the victims of Hurricane Sandy, but I'm honoring my Dad aka my Picky Eater with this comfort food recipe. I will shamelessly admit I'm a daddy's girl and he is the best man a girl could ever call Daddy. He is the one person who has always been with me through thick and thin, he's been my rock and my voice of reason, giving me strength through so many tough times, and believe me I've had many. Haven't we all? He raised me all by himself, not because he had to, but because he chose to. Those who know me, I mean really truly know me, know most of my life has been "a long story", one crazy chapter after another. Through all the crazy, often complicated chapters Big Bad Dad is the one person who has always been there, living the wonderful and the challenging right along with me.

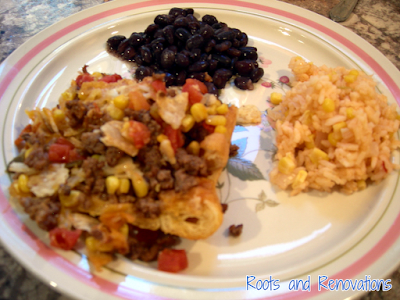
One of our favorite foods, a food that I have always associated with holidays and family get togethers, is Deviled Eggs. I can make a dozen and between the two of us somehow they disappear within a day or so. We have an amusing and ongoing disagreement when it comes to deviled eggs though. I say sweet pickle cubes are a must in deviled eggs, but to quote his paraphrasing of Clint Eastwood in Dirty Harry: "Nobody, but nobody puts pickles in deviled eggs."

So for you deviled egg eaters out there I ask you, sweet pickles or no?
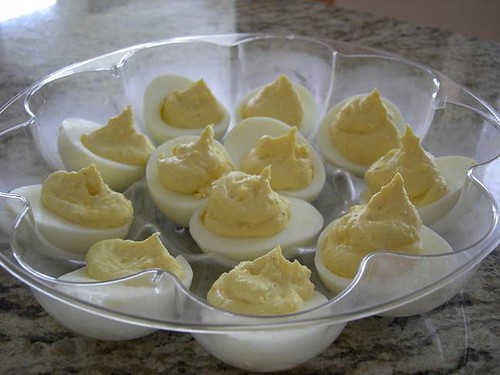
Deviled Eggs

Deviled Eggs

6 hard boiled eggs
3 Tbsp mayo
1 good squirt yellow mustard
a splash vinegar
salt and pepper to taste
1 Tbsp sweet pickle cubes (optional)

How to hardboil eggs:

Lay the eggs in the pan and add enough cold water to cover eggs by 1 inch. Set over high heat and bring just to the boil; remove from heat, cover the pan,and let sit exactly 17 minutes.

When the time is up, transfer the eggs to a bowl of ice cubes and water. Chill for 2 minutes.

Or try the baked method for hard boiled eggs.

After you have hardboiled and cooled your eggs, peel and cut them in half lengthwise. Remove yolks and set whites aside. Using a fork mash yolks into until there are no lumps. Add mayo and mustard. Blend with fork until well combined and smooth. Add a splash of vinegar and salt and pepper to taste, and pickle cubes if using. Put yolk mixture into a re-sealable plastic bag, using scissors, snip a small corner off and pipe even amounts of yolk mixture into egg whites. Store deviled egg in refrigerator.

Follow hashtag #FBS4Sandy to see everyone's posts in support of the cause.

Wednesday, November 7, 2012

Baked Chocolate Donuts For National Donut Day

From Roots And Renovations

Monday morning I discovered that November 5th is National Donut Day, so I was inspired to break out my adorable little Sunbeam Donut Maker and get to baking. As a food lover I think all these National such and such days are pretty cool. They're just a fun and guilt-free excuse to eat some of your favorite foods. After all, if it's a national holiday the fat and calories don't count right?
From Roots And Renovations

My Big Bad Dad gave me my donut maker for my birthday this year and I love it. I was born and raised in the land of the best donuts EVER aka Krispy Kreme and although Krispy Kreme donuts these are not, they're still pretty darn good, and don't induce nearly the amount of guilt. And, thankfully they don't have that melt in your mouth quality that Krispy Kremes do because let me tell you, I could eat about six of their glazed donuts and not bat an eye. Actually, I think I have done that. Fortuntely it was a one time thing or I'd be wider than the Hot and Now sign we Krispy Kreme fans love to see all lit up in the window as we're driving by.

So, back to these donuts I made. They are made with cake mix, which makes them super easy, and they take about 5-7 minutes to make. I when I was first discovering the joys of my donut maker I figured there had to be a recipe out there that used a shortcut such as cake mix so I googled it and sure enough, I found a recipe at Cookie & Cups. The original recipe is for double glazed funfetti donuts and uses a donut pan, so I changed it up slightly. Also, I haven't tried the double glazed method yet, I dip mine in melted candy coating, also known as candy bark. Both chocolate and vanilla candy bark are equally tasty with the chocolate donuts. This go round I used vanilla because I had some leftover from another creation.

From Roots And Renovations
If you aren't familiar with candy bark, you can either find it in the baking aisle near the chocolate chips or in a craft store, such as Michael's. It should be with the cake decorating goodies. When I buy it in the craft store in comes in a bag, but in the grocery store I always find it in a cellophane wrapped trays. If you're using the kind in the bag, start out with about half the bag. Pour it into a microwave safe bowl and heat at 30 second intervals until melted completely, stirring in between. The bark that is packaged in the trays comes in cubes that are about the size of two ice cubes. If you're using the cubes, I recommend starting out with three to four cubes and follow the same heating directions. If the bark starts to harden before you are finished dipping all your donuts don't worry, just pop it back in the microwave. Remember to heat in 30 second intervals and stir frequently.

I like to use the candy bark as opposed to chocolate or white chocolate chips because it's pretty much fool-proof and not nearly as likely to seize up the way that chocolate or white chocolate will if you aren't careful. Plus, the stuff always hardens like it's supposed to.

Easy Baked Devil's Food Donuts

Delicious, super easy and healthy baked donuts using a donut maker.

Prep time: 5 minutes

Cook time: 5-7 minutes

Total time: 30 minutes

Yield: 18 donuts

Ingredients

  • 2 3/4 cups Devil's Food cake mix
  • 3/4 cup buttermilk
  • 2 eggs
  • 2 tablespoons butter, melted
  • cooking spray

Cooking Directions

  1. Whisk together buttermilk and eggs.
  2. Pour into a medium bowl with cake mix and melted butter.
  3. Stir vigorously until all ingredients are completely incorporated.
  4. Spray preheated donut maker with non-stick cooking spray.
  5. Spoon batter into each donut mold, careful not to overfill. Batter should just fill each mold, even to the top of the mold. (Make sure that you do not overflow into the center of each mold.)
  6. Bake for 5-7 minutes.
  7. Remove to cooling rack and repeat with remaining batter.

Sunday, November 4, 2012

Nutella Hot Chocolate - Sinfully Simple!

Now that the weather has started to turn down and we have the heat on all day, I'm craving hot chocolate. There is just something about the sweet, chocolatey drink that soothes me when the temperature dips below 65 degrees, which by my standards is cold weather.

I will confess to taking the easy way out and grabbing a packet of Swiss Miss out of the pantry from time to time. Usually when I do that I atleast doctor it up a bit by adding a generous splash of flavored creamer or a bit of half and half, and in a pinch it's a satisfying drink, but as a girl who loves to do things homemade and spends a huge amount of time in the kitchen those little packets just don't cut it sometimes. For years I've been using Hershey's Hot Cocoa recipe, which can be found on the cocoa powder container, and while it is good, I wanted to try something different today. I decided to try making hot chocolate with Nutella. The stuff is flat out delicious, is it not? My preferred methods for eating Nutella are either straight out of the jar with a spoon or on pretzels. The sweet with the salty, the smooth and creamy with the crunchy is excellent.
From Roots And Renovations
I've made cupcakes with Nutella swirled in, brownies, I've even added it to my smoothies on occasion, so I figured it would work great with hot chocolate too, and I was right! Since it was just me I made a single serving in the microwave, and it could not have been easier. I wanted to amp up the chocolate factor so I added a generous teaspoon of cocoa powder, but if you're not a chocoholic you can skip it. And because I've got a major sweet tooth I added a little sugar, but again, that's totally optional.

And what about those super cute little bitty marshmallows? Don't you just love those? I stumbled upon them in the baking aisle at Target and snagged them for less than $1. For that price I couldn't pass them up and knew I'd find ways to use them. So far I've only used them in my hot chocolate and I've also sprinkled them on top of some chocolate covered donuts I made a while back. On the back of the container I found a recipe for Hot Cocoa Cookies by Christi from Love From The Oven. Although I don't know her personally, I have seen her recipes on Pinterest and visited her site a few times. I always think it's cool and get a little excited to see another blogger mentioned in the media, or on the back on my marshmallow container!

Nutella Hot Chocolate

Recipe by Ms. Roots and Renovations

An easy and delicious single serving microwaved hot chocolate recipe with the wonderful flavor of Nutella.

Prep time: 30 seconds

Cook time: 1-1.5 minutes

Total time: 2 minutes

Yield: 1 serving

Ingredients

  • 1 cup milk
  • 2 heaping teaspoons nutella
  • 1 heaping teaspoon cocoa powder
  • sugar to taste, optional
  • mini marshmallows, for garnish

Cooking Directions

  1. Microwave milk for 1 minute, stirring every 30 seconds.
  2. Add nutella, cocoa powder and sugar (if desired) to a microwave safe mug, then pour in warmed milk.
  3. Stir until all ingredients are dissolved into milk. Microwave an additional 30 seconds or until desired temperature.
  4. Top with mini marshmallows if desired.

Share

Twitter Delicious Facebook Digg Stumbleupon Favorites