.

Soft and Chewy Snickerdoodles

Soft, chewy and full of cinnamon goodness, these cookies are perfect for Christmas!

Gingerbread

Gingerbread is one of those quintessential Christmas sweet treats. This one is flavorful and a cinch to bake up.

No-Fail Sugar Cookies with Royal Icing

This recipe makes great cut-out sugar cookies, and the royal icing is perfect for decorating.

Eggnog Cookies

Soft and cakey cookies with the perfect amount of nutmeg and all the flavor of eggnog.

Nutella Hot Chocolate

This recipe is sinfully simple, full of the flavor of Nutella and can be prepared in the microwave (or on the stovetop) in minutes.

Tuesday, December 25, 2012

Merry Christmas! Let's Recap

Merry Christmas y'all! I hope everyone has had a wonderful holiday, filled with lots of love, family and good food. I certainly have! Christmas Eve was wonderful, followed by a fantastic Christmas day. Both days were spent in the company of wonderful family. I have to admit, the days leading up were extremely busy and at times pretty hectic, but it was the wonderful kind of busy and hectic. My days were filled with the usual mommy duties, as well as baking goodies, lots of grocery shopping, buying gifts and then wrapping. And, let me tell you, the wrapping? I don't know what it was about this year, but I made myself look like a total amateur, and I always thought I was pretty decent in the gift wrapping department. Granted, I can't make a bow to save my life, but I figured I was handy with a roll of wrapping paper. This year, not so much! Almost every box I measured wrong or cut too much off the end and had to cover up bare spots. I was so embarrassed! Thankfully, no one seemed to notice, and if they did they were kind enough not to call me out on it.

Atleast I didn't mess up the food though right? I was a little worried about one dish though, and dessert at that. We all know that's the most important part of the meal right? No? Well, maybe that's just my sweet tooth talking. No matter how you feel about dessert, I'm happy to report, the dessert turned out wonderfully and got rave reviews. I even had a picky eating teenage boy come back for seconds and a ten year old picky girl who claimed it to be, "Okay", but was scarfing it down like nobody's business, so I'm thinking she liked it more than she wanted to admit. But, more on that later.

Now, let's do a little 12 Days of Christmas Baking recap shall we? I thought for anyone who is visiting for the first time or even if you've been following along and maybe you've missed a day in the series somewhere along the way a recap would be the easiest way to see all the Christmas goodies I've been sharing lately. Plus, I won't lie, I wanted to make a cute little collage, and this was as good an excuse as any!


(The photos go left to right on each row.)

1. Soft & Chewy Snickerdoodles - Day 1
2. Spicy Gingersnaps - Day 2
3. Eggnog Cookies - Day 3
4. Coconut Biscotti - Day 4
5. Gingerbread - Day 5
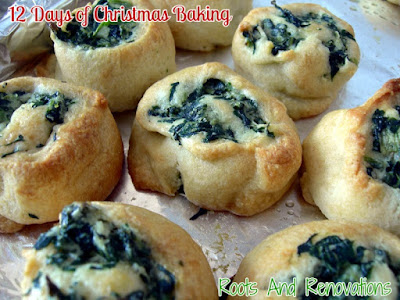
6. Spinach Pinwheels - Day 6
7. Sugar Cookies with Royal Icing - Day 7
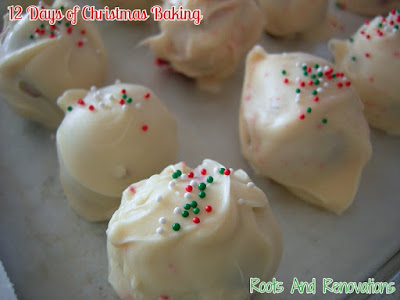
8. Cake Truffles - Day 8
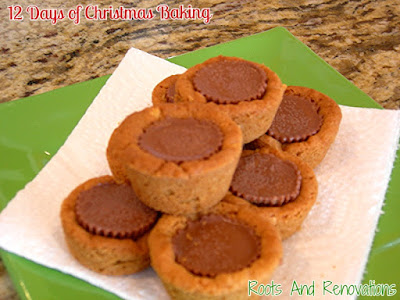
9. Peanut Butter Cup Cookies - Day 9
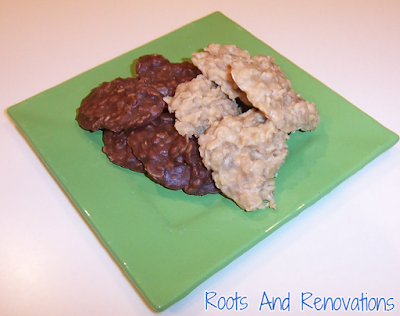
10. Easiest Peanut Butter Fudge - Day 10
11. Spicy Sausage Balls - Day 11
12. Cinnamon Sugar Scones - Day 12

Stay tuned for the reveal of my nerve-racking dessert that turned out to be a success, as well as my mashed potato casserole recipe I tried out on Mr. Picky Eater. Plus, a few more tried and true recipes that I absolutely love, including my Nana's traditional Christmas cake that I've put my own spin on.


Tuesday, December 18, 2012

12 Days of Christmas Baking - Day 12 Cinnamon Sugar Scones

In search of the perfect breakfast treat for Christmas morning? Well, let me make a suggestion. Cinnamon Sugar Scones. They are easy to whip up, perfect for eating while you wind down from unwrapping presents and start gearing up for the big meal of the day. An added bonus is these scones won't weigh you down and hurt your appetite when the feast is finally ready.

I came up with this recipe several years ago when I was craving Bojangles cinnamon biscuits. And, for those of you non-southerners who don't know about Bojangles, it is a fried chicken fast food restaurant that has awesome sweet tea and killer biscuit sandwiches, especially the Cajun Filet Biscuit, my absolute favorite. Their cinnamon biscuits are pretty drool-worthy too. I took the recipe for Cranberry Scones from Martha Stewart's Baking Handbook and reworked it to get my perfect scones. And, I am happy to say that my Cinnamon Biscuit craving was satisfied because the taste was pretty spot on, and let's be honest here, isn't a scone really just the British version of a biscuit?? Judging by the scones I've had, they seem pretty biscuit like to me, and that's not a complaint because I seriously love me some biscuits.

Aside from the taste another thing I love about these scones is that unlike some recipes this one isn't loaded down with butter and heavy cream. The taste is still there, just without a lot of the fat.


Sugary Cinnamon Scones

Scones Dough:
2c. all-purpose flour, plus more for work surface
1/2c. sugar
1 Tbsp baking powder
1/2 tsp salt
6 Tbsp unsalted butter, cut into small pieces, chilled
2/3c. fat-free half-and-half, plus 1 Tbsp reserved

Cinnamon Filling:
2 Tbsp packed brown sugar
1 Tbsp sugar
2 tsp cinnamon

Sugar Glaze:
3 Tbsp Confectioner's Sugar
fat-free half-and-half, as needed

1. Preheat oven to 425 degrees. In a small bowl combine all ingredients for cinnamon filling. Mix until evenly blended. Set aside.

2. In medium bowl, whisk together flour, 1/2 c sugar, baking powder, and salt. Using pastry blender or 2 knives, cut in butter until mixture resembles coarse crumbs. Stir in 2/3c half-and-half until just moistened.

3. On a lightly floured surface, gently knead dough, 5-10 times. Pat into a 1/2 inch thick round or square. Evenly sprinkle half of dough with cinnamon filling mixture. Fold plain side over so that cinnamon filling is sandwiched in the middle. Cut into 8 evenly sized wedges; place on a baking sheet, approximately 5 inches apart. Brush tops with the reminaing 1 Tbsp half-and-half; sprinkle with 1 Tbsp sugar. Bake until golden brown, about 12-15 minutes. Let cool on wire rack.

4. Mix Confectioner's sugar with enough half-and-half to make a glaze thin enough to drizzle. When scones are cooled drizzle with glaze.

Blogger's Day Of Silence

Our country as a whole has taken the shooting Friday at Sandy Hook Elementary School in Newtown, Connecticut very hard. In fact, the whole world has been affected by the tragedy. That impact has led many in the blogging community to declare a day of silence. Some bloggers chose yesterday, some have chosen today. I am part of the community that is taking part in today's Day of Silence.


In addition to being done out of deep respect and sadness, this is being done in an effort to raise money that will go to an organization in the memory of this tragedy. The organization is called The Newtown Family Youth and Family Services. Here is the official description of the support service we are donating to:

"Newtown Youth and Family Services, Inc. is a licensed, non-profit, mental health clinic and youth services bureau dedicated to helping children and families achieve their highest potential. NYFS provides programs, services, activities, counseling, support groups and education throughout the Greater Newtown area.


ANY DONATIONS MADE TO NEWTOWN YOUTH AND FAMILY SERVICES WILL BE DONATED DIRECTLY TO THOSE EFFECTED BY THE SANDY HOOK ELEMENTARY SCHOOL SHOOTING."

Please visit THIS PAGE to make your donation.

We can't imagine how they must be feeling, especially this close to the holidays. We would love for you to spread the word on your own blog, Facebook, Twitter, etc. Let's make a difference and use blogging in a positive way. Thank you in advance for participating.

Love, The Blog World

p.s. If you would like to, copy-paste and repost any part of this, please do. Share on.

Monday, December 17, 2012

12 Days of Christmas Baking - Day 11 Spicy Sausage Balls

Well, I'm doing a little happy dance because the Christmas shopping is officially done. I ended up ordering a few things online today (Yes, last minute I know!) because I couldn't find the styles I wanted at the big box store and I wanted to avoid high prices and a major crowd at the mall. Now, let's hope everything arrives by the predicted Christmas Eve.

I decided to come home from my shopping this afternoon and celebrate with one of my family's holiday favorites Spicy Sausage Balls. They have been a holiday staple ever since I can remember. In fact, my earliest memory of eating and loving sausage balls was when I was about three or four years old. I remember eating them cold for breakfast, which to this day is my favorite way to eat them. There's something about eating them cold, it seems to bring out the spice of the sausage and the sharpness of the cheddar.

Sausage Balls are a pretty popular Christmastime goodies it seems because I see the recipe everywhere. For years I followed the basic recipe as it was given to me, but I've learned that I could adapt it a little and still have the same great will balls or crispy, spicy, cheesy goodness. Spicy sausage and extra sharp cheddar cheese are an absolute must. I have tasted them with regular sausage and regular or sharp cheddar and they don't have the same bold flavor.

The changes I have made are in the amount of Bisquick, and believe it or not, the amount of cheese. I always found that using the amounts in the original recipe left me with a bit of both in the bottom of the bowl that didn't mix in, so I have cut back on both and the flavor is identical. I start with 2 1/2 cups of Bisquick and depending on the brand of sausage I may need the whole 3 cups. I don't have a brand of sausage I swear by, so I use whatever is on sale. Some brands are a little stickier than others and require more Bisquick. The end mixture should not be sticky, so if you find that 2 1/2 cups leaves you with a sticky mixture add gradually, but I have never needed more than 3 cups. Another thing I changed was the baking temperature. I upped it to 350 degrees from 300 degrees. The Spicy Sausage Balls bake at about the same rate, they just get a little crispier on the outside which my family likes. If you don't want the outsides crispy stick with 300 degrees.

Now, go back up a batch and dig in! Then come back and let me know what you think.

Spicy Sausage Balls

Yield: approximately 45

Ingredients

  • 2 1/2 cups (up to 3 cups as needed) Bisquick, or other similar baking mix
  • 16 ounces extra sharp cheddar cheese, grated
  • 16 ounces spicy sausage

Cooking Directions

  1. Preheat oven to 350 degrees.
  2. Add all ingredients to a large mixing bowl. Mix (I suggest using your hands.) until ingredients are completely incorporated and mixture is no longer sticky.
  3. Roll into golf ball sized balls.
  4. Bake for 25 to 30 minutes, until they start to brown slightly.
  5. Using a spatula transfer to a paper towel lined plate to drain excess grease.
  6. Store in the refrigerator.
Note: Store-brand baking mix works fine too, just make sure it is a baking mix similar to Bisquick. Low-fat Bisquick works just the same as the regular in this recipe, so feel free to use that if that is your preference. Also, I do not recommend using pre-shredded cheese. It has anti-clumping ingredients added in that keep it from melting as well as block cheese.

Sunday, December 16, 2012

12 Days of Christmas Baking - Day 10 The Easiest Peanut Butter Fudge Ever!

I know, I know fudge isn't baked, therefore it doesn't technically fall into the Christmas baking category, but it's so good, you'll overlook that minor detail right? Fudge is definitely popular at Christmas and makes an awesome homemade gift if the recipient has a sweet tooth.

I happen to have a massive sweet tooth if you can't tell based on the recipes I've shared so far. I am also a major peanut butter lover. Seriously, I can eat the stuff straight out of the jar with a spoon. I'll take it smooth or chunky, but my preference is smooth, especially in cookies or fudge.

Chocolate ranks pretty high on my list of sweet favorites, but when it comes to fudge I'll take peanut butter over plain chocolate any day. This peanut butter fudge recipe definitely lives up to its name. You melt the butter, mix a couple other ingredients in, boil for a few minutes then add the rest. No candy thermometer or crazy preciseness required. Just measure your ingredients accurately, boil for the full amount of time and you've got a fool-proof fudge anyone will swear took tons of effort. I guarantee it or your money back! Okay, I was kidding on the money back thing, so don't email me asking for a refund on your ingredients please. But I do promise it tastes amazing!

Easiest Peanut Butter Fudge

1/2 cup butter
2 1/4 cups brown sugar
1/2 cup milk
3/4 cup peanut butter
1 teaspoon vanilla extract
3 1/2 cups confectioners’ sugar

In medium saucepan, melt butter over medium heat. Stir in brown sugar and milk. Bring mixture to a boil and boil for 2 minutes. Remove from heat and stir in peanut butter and vanilla. Pour over confectioners sugar in a large mixing bowl. Beat until smooth; pour into an 8×8 inch dish lined with tinfoil and buttered. Chill until firm and cut into squares.


Saturday, December 15, 2012

12 Days of Christmas Baking - Day 9 Peanut Butter Cup Cookies

I absolutely LOVE Peanut Butter Cup Cookies. I am a huge peanut butter cup fan, and adore peanut butter cookies. These cookies give me the best of both worlds. They are pretty great any time of year, but they're perfect for gift giving because their size and shape makes them easy to stack and package. Plus, who doesn't like peanut butter cups?

I will make a little confession, the first time I made these I wasn't sure if the peanut butter cups were supposed to be inserted into the cookie before or after baking so I tried both, and guess what? Either way works! The chocolate will bubble up a little if you stick the peanut butter cups in the dough before baking though (as evidenced in the photo), and they go in super easy after baking, so I say just do it that way. You will need a mini muffin pan to make these, and with this recipe I end up using the whole bag of peanut butter cups, minus the few that mysteriously don't make it that far. Somehow they get eaten before the cookies finish baking. No idea how that happens!


Peanut Butter Cup Cookies

1 3/4 cups all-purpose flour
1/2 teaspoon salt
1 teaspoon baking soda
1/2 cup butter, softened
1/2 cup white sugar
1/2 cup peanut butter
1/2 cup packed brown sugar
1 egg, beaten
1 teaspoon vanilla extract
2 tablespoons milk
40 miniature chocolate covered peanut butter cups, unwrapped

Preheat oven to 375 degrees F (190 degrees C). Sift together the flour, salt and baking soda; set aside.

Cream together the butter, sugar, peanut butter and brown sugar until fluffy. Beat in the egg, vanilla and milk. Add the flour mixture; mix well. Shape into 40 balls and place each into an ungreased mini muffin pan.

Bake at 375 degrees for about 8 minutes. Remove from oven and immediately press a mini peanut butter cup into each ball. Cool and carefully remove from pan.

Friday, December 14, 2012

Taking a break in remembrance and giving thanks

Like many, I am with a very heavy heart after the news of the tragedy that struck the little Connecticut town and the sweet children of and staff of Sandy Hook Elementary School. Those children probably went to school this morning excited for the weekend, never suspecting that it would be anything but a normal school day. Parents never expected to send their kids off to witness what could arguable be the worst tragedy and hardest thing some of them will ever face. The parents of those other 20 children I'm sure never imagined this morning would be the last time they would hug their precious babies and get to hear them say, "I love you."

At this point, I have heard nothing about what could have possibly been a motive, I am guessing some sort of domestic distress since the shooter is said to have entered his mother's classroom, shot her and then 20 students, as well as a handful of other staff members. And, I have no idea what his background or mental state was, I'm sure that will all come out soon. But, regardless of what family problems or how mentally unstable someone may be, I can't imagine taking innocent lives, especially young children.

I say none of this in judgement, it is not my place to do that. I am a Christian and believe that only God has that right. I am heartsick for the families who have lost loved ones today, and my heart hurts for those little children who will carry the scars of this horrible day with them forever. A saying that I have heard is playing on auto-loop in my mind today, "Kiss your kids and call your Momma." That saying seems all too necessary today.

I thank the Lord that my family is so close at hand. My Daddy and my Momma, those are one and the same. I was raised by the best father on Earth and he has always been an amazing mother as well. It feels like an even bigger blessing than usual that he and my kids are under the same roof with me.

If reading this has saddened you further my sincerest apologies. My heart is simply to heavy today to continue with the 12 Days series. I felt that I just needed to take a moment to reflect, show respect for those suffering today, and give thanks for the many blessing in my life. My Daddy and my babies top the list of blessings, followed by the rest of my little family, my amazing friends, my health, the health of my loved ones and my overall wellbeing. So, go kiss your kids and call your Momma.

And because I have chosen to dedicate today to remembrance and my thankfulness and love for my family the photo above is of my beautiful girl Millie. She may be 4-legged and covered in hair, but she's just as much my child as if she were of the 2-legged variety and I had given birth to her. I adore any time that my babies come to me and want to cuddle, but as I was laying down for a nap earlier and she and Duncan, one of my sweet boys piled onto the bed with me, I cherished that moment just a little more.

Thursday, December 13, 2012

12 Days of Christmas Baking - Day 8 Cake Truffles

Cake Balls, or as I call them Cake Truffles are all the rage these days. I'm not sure if she made them famous, but Bakerella sure is well known for them. Her website is loaded down with her Cake Ball and Cake Pop creations. Everywhere I turn I see Cake Truffle related goodies, whether it's a Cake Pop maker, Cake Ball/Pop molds, kits, you name it it's out there.

I just love the things, I make them if I am going to a holiday party. I make them for any kind of party really. I have even been know to give them as party favors. Cake Truffles take only a few ingredients and are rather simple to make. I will admit they can be a bit messy, but my philosophy has always been, "If you aren't making a mess in the kitchen you aren't doing something right." Or at the very least you're not having nearly as much fun as you could be. The only thing that seems a little crazy to me my first time making these was that you bake a cake (using cake mix) then you basically destroy it by turning it into crumbs. After I tasted one I totally forgot all about that and never gave it a second thought.

The real beauty of these, other than the deliciousness is that the flavor combinations are pretty much only limited to your imagination. And, if you are an artistic person you can turn these into little works of art. I've seen them shaped into different objects, including animals. Just google it and you'll see what I mean.


Cake Truffles

A tasty treat perfect for gift giving, handing out as party favors, or just because.

Yield: 3 dozen

Ingredients

  • 1 (18.25 oz) box cake mix, flavor of your choice
  • 1 (16 oz) container prepared frosting, flavor of your choice
  • 1-2 lbs candy coating (start with 1 lb and melt more if needed)

Cooking Directions

  1. Prepare the cake mix according to package directions using any of the recommended pan sizes. When cake is done, crumble while warm into a large bowl, and stir in the frosting until well blended. (I use a 9x13 baking dish and mix the crumbled cake with the frosting in the pan.)
  2. Melt candy coating in a glass bowl in the microwave, or in a metal bowl over a pan of simmering water, stirring occasionally until smooth.
  3. Use a melon baller or small scoop to form balls of the cake mixture. Dip the balls in melted candy coating using a toothpick or fork to hold them. Place on waxed paper to set.
  4. Note: I recommend chilling the cake truffles prior to dipping to ensure easier handling.

Wednesday, December 12, 2012

The 12 Days of Christmas Baking - Day 7 Sugar Cookies

Everybody loves sugar cookies right? No, seriously, they do don't they? I won't call them my favorite cookie, I reserve that title for chocolate chip cookies. Sugar cookies are pretty great though, especially when they are crispy around the edges but still just chewy, with that buttery goodness. Not only am I an avid baker, but I love to decorate cookies (and cakes). As a result, I have a little bit of an addiction to cookie cutters. You name the occasion I probably have a cookie cutter for it, holidays especially. Valentine's Day, St. Patrick's Day, Easter, Halloween, Thanksgiving, and most especially Christmas. When a holiday rolls around I break out the accompanying cookie cutters and get to mixing and rolling.

I've tried various sugar cookie recipes over the years and some are either too bland, come out too hard, or the cookies spread too much resulting in funky looking blobs that slightly resemble their initial shape. I absolutely love and highly recommend No-Fail Sugar Cookies. The recipe makes a generous batch, the dough is easy to work with, the cookies hold their shape, and the resulting cookies taste fantastic. I've seen many mentions of this recipe, so I am apparently not the only one who loves it.

I want to share my secret, or okay, maybe it's not so secret tip with you. As soon as I finish mixing up the dough I like to sandwich portions between wax paper, roll it to the desired thickness then stick it in the fridge or the freezer on cookie sheets to chill. That way you aren't handling the dough too much, which can result in it softening too much, causing the baking cookies to not hold their shape as well. Also, the dough chills faster. Not to mention, you have less mess to clean up.

While the cookies are in the oven baking to a golden deliciousness and smelling the kitchen up something amazing I like to whip up a batch of royal icing to decorate the beauties with. If you haven't worked with royal icing there's a few things you should know:

1. Your mixing bowl and utensils need to be extra clean and free of grease. The grease free thing is important!
2. Always make sure when not using your royal icing you have it sealed in air tight containers or cover the surface with a layer of plastic wrap. The stuff dries out fast! If you are piping it on your cookies it's a good idea to cover the icing tips with a moist paper towel when not using.
3. You REALLY need to follow the instructions precisely. I pretty much wing it with buttercream, but royal icing doesn't work that way. I know it says to mix for what feels like forever, but I promise it is necessary.
4. Allow the icing plenty of time to harden. The stuff will look hardened, but if you start to handle them cookies too soon after icing (other than to eat them) you'll mess up your pretty icing job and we don't want that! But, once the icing has completely hardened it is very sturdy. You can stack cookies on top of each other without worry that the icing will smear, the cookies will stick together, etc. The sturdiness of the icing makes these perfect for shipping if you have a loved one you want to send goodies too.

No-Fail Sugar Cookies
6 cups flour
3 tsp. baking powder
2 cups butter
2 cups sugar
2 eggs
2 tsp. vanilla extract or desired flavoring
1 tsp. salt

Cream butter and sugar until light and fluffy. Add eggs and vanilla. Mix well. Mix dry ingredients and add a little at a time to butter mixture. Mix until flour is completely incorporated and the dough comes together.

Chill for 1 to 2 hours (or use my wax paper hint mentioned above)

Roll to desired thickness and cut into desired shapes. Bake on ungreased baking sheet at 350 degrees for 8 to 10 minutes or until just beginning to turn brown around the edges.

This recipe can make up to 5-dozen 3” cookies.
Recipe from kitchengifts.com

Royal Icing
3 tablespoons Meringue Powder
4 cups confectioners sugar
6 tablespoons warm water (it must be warm water)

Beat all ingredients until icing forms peaks (7-10 minutes at low speed with a heavy-duty mixer, 10-12 minutes at high speed with a hand-held mixer).


* For stiffer icing, use 1 tablespoon less water.
**When using large countertop mixer or for stiffer icing, use 1 tablespoon less water.
Thinned Royal Icing: To thin for pouring, add 1 teaspoon water per cup of royal icing. Use grease-free spoon or spatula to stir slowly. Add 1/2 teaspoon water at a time until you reach proper consistency.
Note: Remember to keep all utensils and mixing bowls grease-free. Yields 3 cups

Tuesday, December 11, 2012

12 Days of Christmas Baking - Day 6 Spinach Pinwheels

Many of us do a good bit of entertaining between Thanksgiving and New Year's, whether we're hosting a cookie swap party or just have friends and family who drop by unexpectedly. Because of that, I think it's not a bad idea to have an arsenal of easy to prepare appetizer recipes at the ready. Even better when those appetizers require minimal ingredients and result in something tasty that your guests will love. One such appetizer for me is Spinach Pinwheels, which are super easy and contain two of my favorite ingredients crescent rolls and spinach. I will admit that I have never eaten spinach plain, unless you count eating it raw in a salad or on a wrap, but I love it in lasagna, spinach dip and of course Spinach Pinwheels.

I was in a rush to get these packed up and headed out the door when I snapped this photo, so please excuse the lack of presentation. Presented on a pretty platter or not, these things are yummy little bits of goodness. I can't decide which scores more points, the taste or the fact that they only require three ingredients. I have only made these a handful of times, and always when I was having folks over or needed something to take to a potluck. Never have I been disappointed in the responses when I serve these. So, do you need a quick and easy appetizer to serve at your upcoming Christmas party? Or maybe you're even thinking ahead already to New Year's Eve, if so, you're doing better than me. Whatever the reason, I urge you to whip up a batch of these little guys and enjoy!

And if you're looking for a sweet treat to serve and are pressed for time, don't have room in the oven or just want to try something different I highly recommend No-Bake Oatmeal Cookies, as they're known in my family Boiled Oatmeal Cookies. You may remember I shared the recipe a while back, but if you missed it you can find it here. They are an absolute Christmas tradition for our family, and in fact, the only thing my Picky Eater requests during my baking frenzy.

Spinach Pinwheels

A simple and delicious appetizer perfect for any occasion.

Prep time: 15 minutes

Cook time: 10-12 minutes

Total time: 25-30 minutes

Yield: 30 pinwheels

Ingredients

  • 2 (8 oz) packages Crescent Rolls
  • 1 (7 oz) package garlic herb cheese spread
  • 1 (10 oz) package frozen chopped spinach, thawed and drained

Cooking Directions

  1. Preheat oven to 400 degrees F.
  2. Split crescent dough in half along center perforation. Flatten one rectangle, sealing perforations.
  3. Spread with 1/4 of the cheese spread and sprinkle with spinach.
  4. Starting with long side, roll dough up, rolling back and forth several times to seal edges.
  5. Cut into 3/4 inch slices (about 15 slices per roll). Arrange the slices one inch apart on ungreased cookie sheet. Continue making the crescent roll ups until all of the ingredients are used.
  6. Bake for 10 to 12 minutes, until lightly browned. Serve immediately or keep warm on a warming tray.

Note: You can substitute garlic and herb cream cheese for the cheese spread. Or, feel free to switch it up and use any flavor cheese spread or cream cheese you like.

Monday, December 10, 2012

12 Days of Christmas Baking - Day 5 Gingerbread

Once the Halloween decorations are taken down and we start talking turkey my food cravings change, as do my baking habits. I begin to crave warm, hearty stick to your ribs comfort foods even more than usual. And I put the chocolate chip cookie recipe aside for a while. I put the brownie and cupcake making on the back burner momentarily, and I start making Spicy Gingersnaps, soft and chewy they are sooo good! Come Thanksgiving and my house is filled with the wonderful smell of sweet potato pies. And lest we not forget my famous no-bake oatmeal cookies aka boiled oatmeal cookies.

There's always a batch of gingerbread or two in there somewhere. I don't have a tried and true recipe yet so I usually go with my standby, Old Fashioned Gingerbread, which I got from allrecipes.com quite some time ago. Overall I am pretty pleased with the recipe. It makes a nice moist gingerbread with a good flavor. I prefer my gingerbread with lemon sauce, but I haven't found a recipe for that I love yet, so when I bake it I usually eat it straight up, or with a little powdered sugar sprinkled on top to purdy it up.


Old Fashioned Gingerbread

1/2 cup white sugar
1/2 cup butter
1 egg
1 cup molasses
2 1/2 cups all-purpose flour
1 1/2 teaspoons baking soda
1 teaspoon ground cinnamon
1 teaspoon ground ginger
1/2 teaspoon ground cloves
1/2 teaspoon salt
1 cup hot water

Preheat oven to 350 degrees F (175 degrees C). Grease and flour a 9 inch square pan.

In a large bowl, cream together the sugar and butter. Beat in the egg, and mix in the molasses.

In a bowl, sift together the flour, baking soda, salt, cinnamon, ginger, and cloves. Blend into the creamed mixture. Stir in the hot water. Pour into the prepared pan.

Bake 1 hour (I found mine was done after baking for approximately 35 minutes.) in the preheated oven, until a knife inserted in the center comes out clean. Allow to cool in pan before serving.

Sunday, December 9, 2012

12 Days of Christmas Baking - Day 4 Coconut Biscotti

Biscotti is the perfect little sweet treat to go with that morning cup of coffee if you want a little something to munch on but don't want to actually eat breakfast. A cookie or even a mini muffin is the route I tend to go if I want something in the morning to go along with my coffee. I am only an early riser if absolutely necessary so I don't find that I often need breakfast. I can usually get by with a cup of coffee until lunch, but sometimes I just want a little something to nibble on and although I don't make it often I find biscotti to be the perfect thing.

Christmas is the perfect time to bake up a batch, or three of biscotti. It has a long shelf life, it's not extremely fragile, so it's easy to transport if you choose to give it away on a goodie tray like I often do, and it packages nicely. Stick some in a cellophane bag, tie it up with a ribbon and you've got a cute little gift to give. I have batched up different flavors over the years, but Coconut Biscotti seems to be my favorite.

You won't find many coconut recipes around here because although I love the stuff Mr. Picky Eater does not. With only two people in the house unless I'm having folks over, going to a potluck or making my Christmas Baked Goodie Bags I skip over the coconut recipes. Mr. Picky Eater won't eat biscotti anyway, so I can get away with making whatever flavor suits my fancy. This flavor definitely suits my fancy. It is a fairly simple recipe with just the right amount of coconut. The flavor is not overpowering, it's pretty much the perfect amount. When there is a batch of these around I find myself nibblinging one every morning with my coffee until suddenly there are no more. That's a sign of a good cookie. And, thankfully the biscotti are pretty low fat, so I am not too riddled with guilt when I eat these.


Coconut Biscotti
Original Recipe From Cooking Light

2 cups all-purpose flour
3/4 teaspoon baking powder
1/4 teaspoon salt
1/4 teaspoon baking soda
1/8 teaspoon grated whole nutmeg
3/4 cup sugar
1 teaspoon vanilla extract
2 large eggs
1 cup flaked sweetened coconut

Preheat oven to 300°.

Lightly spoon flour into dry measuring cups; level with a knife. Combine flour and next 4 ingredients (through nutmeg). Place sugar, vanilla, and eggs in a large bowl; beat with a mixer at medium speed 2 minutes or until thick. Add flour mixture and coconut; stir to combine (dough will be very sticky). Turn dough out onto a heavily floured surface; knead lightly 7 or 8 times. Shape dough into a 15 x 3-inch roll. Place roll on a baking sheet lined with parchment paper, and pat to 1-inch thickness. Bake at 300° for 40 minutes or until roll is golden brown. Cool for 5 minutes on a wire rack.

Cut roll diagonally into 20 (1/2-inch-thick) slices; stand slices upright on baking sheet. Bake 20 minutes (cookies will be slightly soft in center but will harden as they cool). Remove from baking sheet; cool completely on wire rack.

Yields:20 cookies (serving size: 1 biscotto)

2.5 grams of fat

*The original recipe called for 1 1/2 cups flour, but the dough was entirely too sticky.

Saturday, December 8, 2012

12 Days of Christmas Baking - Day 3 Eggnog Cookies

Each season has its signature foods and drinks. For Christmas one of those signature items is Eggnog. It seems to be a drink you either love or won't touch. I fall into the won't touch category. I simply do not drink it, not even a sip or two. Consistency is the main reason. If it was a warm drink I don't think the consistency would bother me, and before you say it, I know, it is occasionally served warm. Well, a few Christmases back a friend's wife sent over a big plate of various cookies, most were decent but nothing to die for. Except one cookie really stuck out with me, and that was the Eggnog Cookie. I had never had these before or even heard of them, but after that I knew I had to add Eggnog Cookies to my Christmas baking repertoire. I wasn't able to get the recipe from said friend, so I searched the web and came up with various recipes that were pretty similar. Me being me, I did a little tweaking to make the recipe my own. The cookies we were given had icing drizzled on top, which I planned to add also, but after baking the cookies and doing a taste-test I nixed the icing idea because the cookies were so good as is just sprinkled with a little additional nutmeg before baking.


These Eggnog Cookies, are not your average cookie. They're soft and a little cakey, not chewy or crispy at all. I typically go for chewy cookies with a little crunch around the edges, but these are great, and I love the hint of spice with that extra boost from the nutmeg sprinkled on top. And, like the Spicy Gingersnaps, if you manage to keep these cookies around for more than a few days you'll be fooled into thinking you just baked them because they keep their freshness well.

Don't forget to add these to your "must bake" list for next Christmas!


EGGNOG COOKIES

2 ½ c. flour
1 t. baking powder
½ t. cinnamon
½ t. nutmeg
3/4 c. butter
1 1/4 c. sugar
½ c. eggnog
1 t. vanilla
2 egg yolks
1 T. nutmeg, for sprinkling

Preheat oven to 300°. In a large mixing bowl, combine flour, baking powder, cinnamon and nutmeg. In another bowl, cream butter and sugar; add eggnog, vanilla and egg yolks. Beat with an electric mixer on medium speed until just combined. Stir flour mixture into eggnog mixture until uniform. Drop by teaspoonfuls onto ungreased cookie sheet; sprinkle cookies lightly with nutmeg. Bake for 23-25 minutes or until bottoms are light brown.

Friday, December 7, 2012

12 Days of Christmas Baking - Day 2 Spicy Gingersnaps

Near the top of my list of Christmas baking goodies is always Spicy Gingersnaps. The spice combination just screams Christmas, not to mention the smell that fills the kitchen while these are in the oven. That molasses, gingery goodness, on man my mouth waters just thinking about it! I find myself craving these cookies..I mean really craving them. I've always been a gingerbread lover. But these are over the top good to me. Just the perfect amount of spices and the texture is amazing, soft and chewy. They almost seem to melt in your mouth.

This is a super simple cookie to whip up, you don't even need to break out the mixer, you can stir these up by hand. They can be in the oven in no time because they don't require chilling. Another great thing about these is that if you manage to keep these around for more than a few days they are still great. The use of oil instead of butter keeps them soft and chewy. And, that's one thing that intrigues me about this recipe is that it contains NO butter. None. Zero. Zilch. Not a single ounce. I've never tried sub'ing butter for the oil, I figured why risk ruining a wonderful thing? Curiosity hasn't gotten the best of me with this recipe, and I'm determined that it never will. The dough is formed into balls and half is dipped in sugar so they come out having these yummy little sugary sweet crunchies on top. Unfortunately when using just plain white granulated sugar those crunchies don't show up as well in the finished product, so I prefer to use sanding sugar, although I tend to use a bit of each. I have also tried colored sugar, which I don't recommend simply because it doesn't show up as well what with the darker brown coloring of the cookie.

I do not know where this recipe originated. It was given to me by my former boss, titled "Angela's Gingersnaps", Angela being his wife's name. So possibly she developed or perfected the recipe. If so she came up with one heck of a cookie and my praises goes to her.


Spicy Gingersnaps

4 c. all-purpose flour
3 tsp. baking soda
2 tsp. cinnamon
2 tsp. ginger
1 tsp. salt
1 1/3 c. vegetable oil(or another flavorless oil, I've also used canola)
2 eggs
2 c. sugar
1/2 c molasses

In medium bowl, sift together flour, baking soda, cinnamon, ginger and salt, set aside. Mix together oil, eggs, sugar and molasses just until combined. Add flour mixure and stir until all ingredients are incorporated. Roll dough into small balls, about 1 tsp each. Dip 1/2 of each ball into sugar and place sugar side up on cookie sheet. Space several inches apart. Bake at 350 degrees for 8-10 minutes.

Makes about 4 dozen.

Thursday, December 6, 2012

12 Days of Christmas Baking - Day 1 Soft & Chewy Snickerdoodles

As we all know, Christmas is fast approaching, which means many of us have started decking the house, hitting the stores, wrapping the presents and best of all, baking! I haven't started decorating yet, and I just kicked off the shopping yesterday. The baking? Would you believe I haven't started going crazy with that yet either?

Even if I haven't kicked off my holiday baking frenzy yet, and believe me, it will be a frenzy like it is every year, I am kicking off my 12 Days of Christmas Baking. I will share with you all the wonderful cookies I bake in an effort to plump up my loved ones each Christmas. And, even though it's not a sweet recipe Christmas just wouldn't be the same around my house if I didn't bake atleast one batch of my yummy Sausage Balls, so you can expect to find that recipe too! You can expect to find a candy recipe or two mixed in there as well, because Christmas just wouldn't be the same without whipping up some kind of yummy candies to give away right?

I thought I'd kick things off with some yummy snickerdoodles. They are great anytime of year, but the cinnamon sugar thing makes me think of Christmas, and if you are giving cookies away, you can seldom go wrong with snickerdoodles.

I'm a sucker for a good cookie, and I'm always craving the adventure of a new recipe. I remember eating snickerdoodles as a kid, but my experience with them was minimal. For whatever reason, they just weren't a cookie we had around my house. I remember them as buttery, soft and chewy with a wonderful crispness on the outside from the cinnamon sugar they are rolled in before going in the oven. Since there was no tried and true recipe passed down through my family I decided to dig around the web and look for one with good reviews. Before my addiction to Pinterest I used allrecipes.com a good bit, and I've seen"Mrs. Sigg's Snickerdoodles" over and over on allrecipes. When I see a recipe with a high rating from a huge number of people I figure it's probably pretty good and worth giving a try.

Since first trying these it's not a recipe I've made dozens of times..yet! But, overall I've been pretty happy with these snickerdoodles, they have a nice flavor, but aren't as buttery as I would like, so I'll have to work on that. I made an adjustment to the cinnamon sugar mixture from that in the original recipe. The first go round with these it looked like there wasn't nearly enough sugar so I doubled the amount and found that was perfect for me. I also refrigerate the dough for about 30 minutes before prepping it for the oven.

Soft & Chewy Snickerdoodles

1/2 cup butter, softened
1/2 cup shortening
1 1/2 cups white sugar
2 eggs
2 teaspoons vanilla extract
2 3/4 cups all-purpose flour
2 teaspoons cream of tartar
1 teaspoon baking soda
1/4 teaspoon salt
4 tablespoons white sugar
2 teaspoons ground cinnamon

Preheat oven to 400 degrees F (200 degrees C).

Cream together butter, shortening, 1 1/2 cups sugar, the eggs and the vanilla. Blend in the flour, cream of tartar, soda and salt. Shape dough by rounded spoonfuls into balls.

Mix the 3 tablespoons sugar and the cinnamon. Roll balls of dough in mixture. Place
2 inches apart on ungreased or parchment lined baking sheets.

Bake 8 to 10 minutes, or until set but not too hard. Remove immediately from baking sheets to cooling rack.

Makes approximately 48 cookies

Share

Twitter Delicious Facebook Digg Stumbleupon Favorites