.

Soft and Chewy Snickerdoodles

Soft, chewy and full of cinnamon goodness, these cookies are perfect for Christmas!

Gingerbread

Gingerbread is one of those quintessential Christmas sweet treats. This one is flavorful and a cinch to bake up.

No-Fail Sugar Cookies with Royal Icing

This recipe makes great cut-out sugar cookies, and the royal icing is perfect for decorating.

Eggnog Cookies

Soft and cakey cookies with the perfect amount of nutmeg and all the flavor of eggnog.

Nutella Hot Chocolate

This recipe is sinfully simple, full of the flavor of Nutella and can be prepared in the microwave (or on the stovetop) in minutes.

Showing posts with label dessert. Show all posts

Wednesday, May 22, 2013

Birthday Pupcakes For Millie

So..it's been a while right? Yeah, I know. Feel free to call me a slacker because part of my absence has definitely been because I was unmotivated, or in less desirable terms, lazy. Mostly though, my absence started off because I had a lot on my mind. I was pretty stressed over a few family matters, but am happy to report that all is fine. Many prayers were said, and much thanks was given when those prayers were answered, you have my word on that. But, I'll spare you my saga and say that I will try much harder to share my projects, my recipes and my not so exciting life with y'all regularly.

Today is a pretty special day in our house. We celebrate my baby girl's birthday today. Millie is three years old today, and time has really flown by. Of course, since she is a dog and not a human child, and we don't have her birth parents she hasn't been with us since birth, so she hasn't been a part of the family for a full three years yet. I remember her entry into the family like it was yesterday.


After much searching online we found a liter of English Labs in the Asheville area of the North Carolina mountains that came from gorgeous parents and champion bloodlines, exactly what we were looking for. We knew we wanted a black girl, so we packed up the car with a new crate and plenty of toys and headed to the mountains in hopes of getting our girl. It was total love from day one. I won't like, she was H-E-Double Hockeysticks on four paws from the moment she got home and hasn't slowed up yet. She is absolutely the alpha to her two older brothers and the complete opposite of Duncan her yellow Lab brother, but she has a great temperament and the most amusing personality. I love watching her with Mr. Picky Eater. They have so much fun together and the most amazing bond. That little girl definitely has his heart.

She can be headstrong and frustrating when she wants to, but fuss at her and she turns into the most pitiful little girl ever. I've never met another dog like Millie and I wouldn't trade her for all the money in the biggest bank in the world. Along with her two brothers she's got my whole heart. I wanted so badly to bake my girl a birthday cake today, but her poor brother Duncan has so many allergies that I never get to bake goodies for them. His allergies are so bad that he's currently on a food trial, but that's a story for another time. When Duncan was a puppy, before we learned of his many allergies I did bake cupcakes for his first birthday, so I thought I would share that recipe with y'all in honor of my girl. These pupcakes and frosting are totally dog friendly, unless of course your dog has allergies to any of the ingredients. If your dog has a sensitive stomach or doesn't eat a variety of different foods I would start them out with a small amount, depending on the size of the dog, but since these are mild and not incredibly fatty you shouldn't have an issue.


Pupcakes with Peanut Butter Frosting
dog-friendly recipe

Yield: 20 pupcakes or 1 bundt cake

cake/cupcakes:
3 ripe bananas, mashed
3/4 cup unsweetened applesauce
3 eggs
1 1/2 cup all purpose flour
3/4 cup rolled oats (quick-cooking works fine)
1 teaspoon baking soda
2 teaspoons baking powder
2 teaspoons cinnamon

Mix mashed bananas and applesauce together, then beat in eggs.
Toss in all dry ingredients and beat until completely combined.
Bake at 350 degrees in lightly greased muffin tins or bundt pan. (Approximately 25 minutes for cupcakes and 30-40 minutes for bundt cake)

frosting:
1/2 brick (4 oz) light cream cheese, softened
1/4 cup peanut butter
2 bananas, mashed
small dog biscuits, candles or slices of banana for decorating

Beat all ingredients together until smooth.
Frost completely cooled cake/cupcakes and adorn with desired decorations

Friday, March 15, 2013

Donut Heaven - Apple Pie Donuts

Recently one of my favorite ladies came over for a little girl time. You know us girls, we have to get together, gossip and catch up from time to time, and this catch up was long overdue. Me being me, I had to make something sweet to snack on. When us girls get together there is always food involved, and usually alcohol. There was no alcohol this time, but definitely some delicious food. Jessica brought over this delicious Artichoke Bread she found on Pinterest and if I hadn't eaten dinner shortly before hand I think we might have been fussing over who got the last piece it was that good. I haven't made it myself yet, but I did repin it, so if you want to check it out click here.

I decided on Apple Pie Donuts as our sweet treat for a few reasons: I absolutely adore my little Donut Maker, which is a different brand than this, but very similar (mine is a Sunbeam, this one is a Babycakes), which hasn't gotten nearly as much use as I'd like as of late, baked donuts are an easy treat and I was pressed for time, and I had some apple pie filling left from a previous recipe that I needed to use up. Me being me, I couldn't just follow a recipe to the letter, I had to adapt it, so I took a recipe that I of course found on Pinterest and changed it up slightly. The result was delicious, and I would definitely make Apple Pie Donuts again. However, for the donut itself next time I would do a cake mix donut because the texture of these was a little crumbly. I imagine using spice cake would be really good, or I would use yellow cake mix and add to it for a spiced up donut. Most of my donut recipes use cake mix as the base. The resulting donut has a good flavor and the texture is pretty much spot on with a Sweet Sixteen Donut.

I didn't make major changes to the recipe, I simply replaced the melted butter with vegetable oil, skipped the apple pie spice and upped the cinnamon. And, for the glaze I used maple syrup in place of the milk. Plus, I always find that the donuts need a few minutes longer to bake than the recipes call for.

If you love a donut with chocolate glaze check back soon because I found a chocolate glaze that I absolutely love and will share with you soon. And, want more donut flavor ideas? Like, maybe maple bacon? Caramel apple? Or what about Carrot Cake? Well, those plus a ton of other mouth watering baked donut recipes are on my Pinterest Donut board, so go check em out!


Apple Pie Donuts
adapted from: Jam Hands

Makes 12-14 donuts
1½ cups plain flour
½ cup sugar
1½ teaspoons baking powder
2 teaspoons ground cinnamon
9 tablespoons vegetable or canola oil
½ cup canned pie apple, mashed
½ cup milk
1 egg, lightly beaten

Optional:
Powdered sugar glaze (Use about 1 to 2 cups of powdered sugar and a few teaspoons of maple syrup to thin it)

1. Preheat Donut machine. Combine dry ingredients in a large bowl. Make a well in the center. Whisk in the butter, apple, milk and egg until mixture forms a smooth batter.
2. Spray machine with non-stick cooking spray. Fill bases of preheated donut rings with batter. Close lid and cook for 6 minutes or until donuts are golden and cooked. Use a non-stick spatula (wooden/bamboo tongs work well too) to transfer donuts to a wire rack. Repeat with remaining batter to make 12-14 donuts in total. Garnish with extra apple pie filling and a simple powdered sugar glaze.

Original recipe from Sunbeam

Saturday, March 2, 2013

Celebrating A Delicious Food - National Peanut Butter Day

Yesterday was National Peanut Butter Day. Yes, I know I'm a day late, but in my defense I didn't discover this wonderful holiday until late in the day and by then I was already baking two kinds of delicious donuts and getting ready for some girl time later in the evening. But, actually, according to punchbowl.com January 24th is, and since I didn't get that memo and some sources say it was yesterday I seem to have missed it all the way around.

In honor, I thought I'd wax poetic about my love for peanut butter. Okay, not really because let's be honest, if I tried that it would just be scary for all of us. But, I do seriously love peanut butter. I'm the girl who will eat it straight from the jar with a spoon. I'll dip pretzels in it, smear it on some saltine crackers, add it to a smoothie. I'll even go healthy and eat it on apples. Crunchy or creamy doesn't matter too much, although if I have a choose I choose creamy every time. And, I'm not a fan of the thinner natural peanut butters, nope give me the thick and smooth stuff with all the added sugar and probably a few ingredients I don't know how to pronounce. A few of my favorite recipes that I have shared in the past can be found here, here, and here. The only way I can think of that I won't eat peanut butter is in savory dishes. I know some people totally disagree with me, and that's okay, I respect that, but for me, peanut butter is not meant to be included in my main course.

If I had to choose my favorite way to get my peanut butter fix it would be paired with chocolate. Whether combined in a cookie, mixed up in a no-bake pie or as part of some kind of candy I don't care, just give me the two together. It's no secret that I have a massive sweet tooth and Reese's Cups are quite possibly my favorite candy. It's also no secret that I like to try to make things from scratch, if for no other reason than to prove that I can. I have made my share of faux Reese's Cups over the years, but my absolute favorite chocolate and peanut butter concoction to make is Real Deal Chocolate Peanut Butter Bars aka Reese's Cup Bars. I don't know the original source, but the recipe was given to me by a friend whose dad makes them. From the first taste I was in love. They are simple if a bit messy to make, but well worth it. The only downside to these amazing bars are that you have to wait atleast an hour after making to cut into them because they have to chill. That hour feels like days to me! Not to mention, once I cut into them it's pretty hard not to eat one every time I enter the kitchen.

Once chilled you can store these little bits of heaven at room temperature or in the fridge. If you store them at room temp they will get pretty soft. I prefer storing them in the fridge, but then again, I just prefer my peanut butter cups crunchy and cold anyway. So, clearly it's just a matter of choice. If you have never eaten them cold give it a try, I swear it's amazing!

As for the photo, can I rant about that for a second please? As I said, I was baking donuts yesterday so this photo is from a little while back, and I don't love it. Do you ever take photos and then you either accidentally delete them or can't remember where the heck you saved them? Yeah, that would be me right about now. If you remember the computer crises a few weeks back you'll understand why I know the photos aren't saved to my hard drive. But, I always back photos up to flashdrives or cd's and I can't find the photos on either. Oh well, atleast I found one photo so that I could share these babies.


Real Deal Chocolate Peanut Butter Bars
aka Reese's Cup Bars
1 cup (2 sticks) butter, melted
1 1/2 cups graham cracker crumbs
1 1/2 cups smooth peanut butter
3 cups confectioner's sugar
12 oz. semisweet chocolate chips
1/2 cup smooth peanut butter

1. Pour melted butter into a 9x13 inch glass pan, stir in graham cracker crumbs. Add peanut butter and confectioner's sugar, and mix until completely incorporated. Press evenly into the bottom of the pan.
2. In a double boiler, melt chocolate chips and remaining 1/2 cup of peanut butter. Stir occasionally until completely melted and mixture is combined. Pour on top of peanut butter filling mixture, and smooth evenly. Chill in the refrigerator atleast one hour before cutting into squares.
Note: A great trick I use is to place the pan I am making the bars in over the large burner on the stovetop and turn the heat to medium, toss your 2 sticks of butter, cubed into the dish and stir it around til it's melted. When the butter is melted turn the heat off and proceed with the recipe as instructed. This way saves me from dirtying up another dish and the pan is warm so the other ingredients are easier to incorporate. And when cutting these I like using a bench scraper. That's my little trick when cutting any kind of bars. I just mash that baby down into them and get straight cuts and perfectly square bars everytime.

Saturday, February 16, 2013

Snowy Days & Snow Cream

If you're a southerner you know snow days are few and far between. When one comes along it's a pretty big deal. If the white stuff falls on a weekday schools are almost guaranteed to shutdown along with many businesses and the grocery stores will be packed. Here in Charlotte some areas got a very minor sprinkling several weeks ago, but here at our house we saw next to nothing. Today has been a different story. I didn't know until last night snow was even in the forecast and being that yesterday was very warm for February I brushed it off as highly unlikely. I awoke this morning to a light sprinkle that lasted off and on through most of the afternoon, but never accumulated. So, I went about my business, headed out late this afternoon to run an errand and grab dinner, and was told while we were out that the snow would hit in twenty minutes. My thought? Yeah, right!

Sure enough, headed to dinner about ten minutes later and we spotted a few flakes mixed with a sprinkling of rain that turned to a total white out less than 5 minutes later. I prefer to have visibility while in a moving automobile, so we stopped at a drive-through for take out and before we could get home, not even ten minutes later, the ground was covered.

My babies are some very happy dogs tonight, especially my Millie girl, she's an active wild woman anyway, but she hit the yard running when she discovered the snow. My black girl came in white from rooting around and kicking up so much snow. I don't expect we'll have enough snow to build any snowmen or have any snowball fights, not that I would, but I think we have just enough to pretty up the trees for a little while. Hopefully, this pretty white stuff won't melt and re-freeze leaving us with tons of ice. The melting and refreezing to ice is the whole reason I dread snow. Not to mention I hate being cold, but I'll stop right there before I start to complain.

One thing I remember fondly from snow days as a little girl is Snow Cream. It was a rare thing, but such a fun treat, and it's so easy to make. I haven't made any this snowfall, but thought I'd share the "recipe" with you in case it's something you've never heard of or just aren't sure how to make. It is ridiculously easy to make and so good. There aren't really exact measurements, atleast there never were around our house. Just remember to add your liquid gradually and it should be the consistency of ice cream, not slush.


Snow Cream

a large bowl of clean white snow (no yellow snow, yuck!)
milk
vanilla extract
granulated sugar

Add a small amount of milk to the bowl of snow, starting with a few tablespoons. Gently stir, add more milk gradually until you reach almost ice cream consistency.
Add 1-2 teaspoons of vanilla extract, more or less to suit your taste and depending on the amount of snow you are using.
Add 1-2 tablespoons of granulated sugar, more or less to taste (I would go with more since I have a major sweet tooth.) Gently stir to combine.
Serve immediately, or if yours has gotten a little runny put it in the freezer for a bit to get to the ice cream consistency.

If you don't snow you can also used shaved ice to make Snow Cream, so if you have one of those fun snow cone makers, break it out and shave some ice! And, I have seen chocolate and strawberry flavored Snow Cream, although I have tried neither, but if plain of vanilla isn't your thing visit my trusty friend google and give either flavor a search. Let me know which flavor you try and what you think of it.


Thursday, February 14, 2013

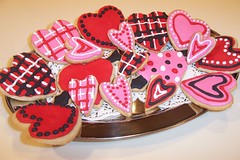
Sharing Some Sugar Cookie Love

Waaaay Early V-day cookies

Happy Valentine's Day y'all!

Love is in the air..

And, it has nothin' to do with a man. It's all about the cookies. Yes, you heard me right, colorful, sugary, heart-shaped ones to be exact. They say food is the way to a man's heart, well I'm pretty sure it's the way to mine too. Diamonds are great, and I love a great pair of shoes, although, for me it's sneakers or flip-flops, I'll pass on the stilettos. And, I love a little glitz and glitter from time to time, but a wonderful meal or a decadent dessert is the way to win me over. Heck, even a batch of adorably decorated cookies or cupcakes and I'm your girl.

I think this is probably one of the cutest batches of decorated cookies I've done, and of course Valentine's Day just wouldn't be Valentine's Day with out some sort of cute dessert all decked out in pink and red, right? This is my go-to sugar cookie and icing recipe: No-Fail Sugar Cookies with royal icing, and I've shared the recipe for both here before. They were part of my 12 Days of Christmas Baking.

Go here for my tips on working with the dough, which by the way, my method makes it super easy to work with and my way chills the dough much faster than normal. You'll also find my tips on preparing and working with the royal icing. They aren't the be all end all tips, but definitely what works best for me. If you have great tips please feel free to share, I'm always looking for new methods or ways to make things easier. If you share tips and I love them I'll definitely be sure to mention them and shout you out in the future.

No-Fail Sugar Cookies
6 cups flour
3 tsp. baking powder
2 cups butter
2 cups sugar
2 eggs
2 tsp. vanilla extract or desired flavoring
1 tsp. salt

Cream butter and sugar until light and fluffy. Add eggs and vanilla. Mix well. Mix dry ingredients and add a little at a time to butter mixture. Mix until flour is completely incorporated and the dough comes together.

Chill for 1 to 2 hours (or use my wax paper hint mentioned above)

Roll to desired thickness and cut into desired shapes. Bake on ungreased baking sheet at 350 degrees for 8 to 10 minutes or until just beginning to turn brown around the edges.

This recipe can make up to 5-dozen 3” cookies.
Recipe from kitchengifts.com

Royal Icing
3 tablespoons Meringue Powder
4 cups confectioners sugar
6 tablespoons warm water (it must be warm water)

Beat all ingredients until icing forms peaks (7-10 minutes at low speed with a heavy-duty mixer, 10-12 minutes at high speed with a hand-held mixer).


* For stiffer icing, use 1 tablespoon less water.
**When using large countertop mixer or for stiffer icing, use 1 tablespoon less water.
Thinned Royal Icing: To thin for pouring, add 1 teaspoon water per cup of royal icing. Use grease-free spoon or spatula to stir slowly. Add 1/2 teaspoon water at a time until you reach proper consistency.

Saturday, January 5, 2013

A Look Back - Eggnog Pie

Ever think you have a great idea, but due to poor planning or unforeseen circumstances things go horribly wrong, or at the very least just turn out to be a flop? Yeah, I tend to have that happen too. But, more often, I have moments where I think that's going to happen and things turn out okay. This Christmas Eve's dessert was a perfect example.

It has become a family tradition that I spend Christmas Eve with a little piece of my small extended family - my aunt Trish, her husband and my two favorite kiddos, my cousins, their son and daughter. Trish and I each make a few dishes apiece for the meal, and as with every event I am a part of, I bring dessert. Since the main mouth I feed other than my own is Mr. Picky Eater who is not much of a sweets eater I usually take our Christmas Eve dinner as a chance to try out a new dessert recipe. Last year was Eggnog Cheesecake which was amazing!

This year I see-sawed between Gingerbread Cheesecake and Eggnog Pie, so I took to Pinterest for a little inspiration. I decided on the Eggnog Pie, as you probably already guessed, and I found a few inspiring recipes. Since it is Eggnog, I wanted a custardy pie, but when it came down to it, I had a good bit of other cooking to do so I wanted to skip anything with eggs that was an actual custard and would require considerable cooking time. I found one recipe that involved a few minutes of cooking, but pretty much just needed a few hours to chill. Then I found another recipe that was two layers, required no cooking, but a container of Cool Whip, which I realized I didn't have to spare because I needed it for another recipe (which I will share soon).

Anyway, long story short, I planned on doing the cooked version, but due to unclear instructions I didn't realize until after I had done the grocery shopping and refused to go back out that the pudding it called for was probably not supposed be the instant kind. With that said, I decided to wing it and hope for the best. I admit, I was a bit nervous, but it turned out great. Both kids went back for seconds with my favorite boy claiming it was "Really good!" and my silly favorite girl claiming, "It's okay, I just want the crust." Trust me, the way that girl was eating that pie, she liked more than just the crust.

If you're an Eggnog fan with some leftover from Christmas give this pie a try, I bet you'll love it. Or, if you're all out of Eggnog, save the recipe for next year. It's too easy and too delicious to pass up. And, if you're interested in checking out the other Eggnog Pie recipes that caught my eye check out my Edible Christmas Pinterest board, they're all there.


No-Bake Eggnog Pie

Ingredients

  • 1 9 inch prebaked pie crust, cooled (store-bought works fine)
  • 4 oz cream cheese, softened (I used low-fat)
  • 2 packages (4 servings each) instant vanilla pudding
  • 2 cups eggnog
  • 1 1/4 cup milk

Cooking Directions

  1. In a medium bowl, using an electric mixer, beat together softened cream cheese and pudding mix, until smooth and cream cheese no longer has any lumps.
  2. Add eggnog and milk, beat until completely combined into a smooth mixture.
  3. Pour into cooled, pre-bake pie crust. Cover surface of pie with plastic wrap and refrigerate for atleast 3 hours.
  4. Sprinkle with nutmeg and/or top with whipped cream if desired.

Tuesday, December 25, 2012

Merry Christmas! Let's Recap

Merry Christmas y'all! I hope everyone has had a wonderful holiday, filled with lots of love, family and good food. I certainly have! Christmas Eve was wonderful, followed by a fantastic Christmas day. Both days were spent in the company of wonderful family. I have to admit, the days leading up were extremely busy and at times pretty hectic, but it was the wonderful kind of busy and hectic. My days were filled with the usual mommy duties, as well as baking goodies, lots of grocery shopping, buying gifts and then wrapping. And, let me tell you, the wrapping? I don't know what it was about this year, but I made myself look like a total amateur, and I always thought I was pretty decent in the gift wrapping department. Granted, I can't make a bow to save my life, but I figured I was handy with a roll of wrapping paper. This year, not so much! Almost every box I measured wrong or cut too much off the end and had to cover up bare spots. I was so embarrassed! Thankfully, no one seemed to notice, and if they did they were kind enough not to call me out on it.

Atleast I didn't mess up the food though right? I was a little worried about one dish though, and dessert at that. We all know that's the most important part of the meal right? No? Well, maybe that's just my sweet tooth talking. No matter how you feel about dessert, I'm happy to report, the dessert turned out wonderfully and got rave reviews. I even had a picky eating teenage boy come back for seconds and a ten year old picky girl who claimed it to be, "Okay", but was scarfing it down like nobody's business, so I'm thinking she liked it more than she wanted to admit. But, more on that later.

Now, let's do a little 12 Days of Christmas Baking recap shall we? I thought for anyone who is visiting for the first time or even if you've been following along and maybe you've missed a day in the series somewhere along the way a recap would be the easiest way to see all the Christmas goodies I've been sharing lately. Plus, I won't lie, I wanted to make a cute little collage, and this was as good an excuse as any!


(The photos go left to right on each row.)

1. Soft & Chewy Snickerdoodles - Day 1
2. Spicy Gingersnaps - Day 2
3. Eggnog Cookies - Day 3
4. Coconut Biscotti - Day 4
5. Gingerbread - Day 5
6. Spinach Pinwheels - Day 6
7. Sugar Cookies with Royal Icing - Day 7
8. Cake Truffles - Day 8
9. Peanut Butter Cup Cookies - Day 9
10. Easiest Peanut Butter Fudge - Day 10
11. Spicy Sausage Balls - Day 11
12. Cinnamon Sugar Scones - Day 12

Stay tuned for the reveal of my nerve-racking dessert that turned out to be a success, as well as my mashed potato casserole recipe I tried out on Mr. Picky Eater. Plus, a few more tried and true recipes that I absolutely love, including my Nana's traditional Christmas cake that I've put my own spin on.


Tuesday, December 18, 2012

12 Days of Christmas Baking - Day 12 Cinnamon Sugar Scones

In search of the perfect breakfast treat for Christmas morning? Well, let me make a suggestion. Cinnamon Sugar Scones. They are easy to whip up, perfect for eating while you wind down from unwrapping presents and start gearing up for the big meal of the day. An added bonus is these scones won't weigh you down and hurt your appetite when the feast is finally ready.

I came up with this recipe several years ago when I was craving Bojangles cinnamon biscuits. And, for those of you non-southerners who don't know about Bojangles, it is a fried chicken fast food restaurant that has awesome sweet tea and killer biscuit sandwiches, especially the Cajun Filet Biscuit, my absolute favorite. Their cinnamon biscuits are pretty drool-worthy too. I took the recipe for Cranberry Scones from Martha Stewart's Baking Handbook and reworked it to get my perfect scones. And, I am happy to say that my Cinnamon Biscuit craving was satisfied because the taste was pretty spot on, and let's be honest here, isn't a scone really just the British version of a biscuit?? Judging by the scones I've had, they seem pretty biscuit like to me, and that's not a complaint because I seriously love me some biscuits.

Aside from the taste another thing I love about these scones is that unlike some recipes this one isn't loaded down with butter and heavy cream. The taste is still there, just without a lot of the fat.


Sugary Cinnamon Scones

Scones Dough:
2c. all-purpose flour, plus more for work surface
1/2c. sugar
1 Tbsp baking powder
1/2 tsp salt
6 Tbsp unsalted butter, cut into small pieces, chilled
2/3c. fat-free half-and-half, plus 1 Tbsp reserved

Cinnamon Filling:
2 Tbsp packed brown sugar
1 Tbsp sugar
2 tsp cinnamon

Sugar Glaze:
3 Tbsp Confectioner's Sugar
fat-free half-and-half, as needed

1. Preheat oven to 425 degrees. In a small bowl combine all ingredients for cinnamon filling. Mix until evenly blended. Set aside.

2. In medium bowl, whisk together flour, 1/2 c sugar, baking powder, and salt. Using pastry blender or 2 knives, cut in butter until mixture resembles coarse crumbs. Stir in 2/3c half-and-half until just moistened.

3. On a lightly floured surface, gently knead dough, 5-10 times. Pat into a 1/2 inch thick round or square. Evenly sprinkle half of dough with cinnamon filling mixture. Fold plain side over so that cinnamon filling is sandwiched in the middle. Cut into 8 evenly sized wedges; place on a baking sheet, approximately 5 inches apart. Brush tops with the reminaing 1 Tbsp half-and-half; sprinkle with 1 Tbsp sugar. Bake until golden brown, about 12-15 minutes. Let cool on wire rack.

4. Mix Confectioner's sugar with enough half-and-half to make a glaze thin enough to drizzle. When scones are cooled drizzle with glaze.

Sunday, December 16, 2012

12 Days of Christmas Baking - Day 10 The Easiest Peanut Butter Fudge Ever!

I know, I know fudge isn't baked, therefore it doesn't technically fall into the Christmas baking category, but it's so good, you'll overlook that minor detail right? Fudge is definitely popular at Christmas and makes an awesome homemade gift if the recipient has a sweet tooth.

I happen to have a massive sweet tooth if you can't tell based on the recipes I've shared so far. I am also a major peanut butter lover. Seriously, I can eat the stuff straight out of the jar with a spoon. I'll take it smooth or chunky, but my preference is smooth, especially in cookies or fudge.

Chocolate ranks pretty high on my list of sweet favorites, but when it comes to fudge I'll take peanut butter over plain chocolate any day. This peanut butter fudge recipe definitely lives up to its name. You melt the butter, mix a couple other ingredients in, boil for a few minutes then add the rest. No candy thermometer or crazy preciseness required. Just measure your ingredients accurately, boil for the full amount of time and you've got a fool-proof fudge anyone will swear took tons of effort. I guarantee it or your money back! Okay, I was kidding on the money back thing, so don't email me asking for a refund on your ingredients please. But I do promise it tastes amazing!

Easiest Peanut Butter Fudge

1/2 cup butter
2 1/4 cups brown sugar
1/2 cup milk
3/4 cup peanut butter
1 teaspoon vanilla extract
3 1/2 cups confectioners’ sugar

In medium saucepan, melt butter over medium heat. Stir in brown sugar and milk. Bring mixture to a boil and boil for 2 minutes. Remove from heat and stir in peanut butter and vanilla. Pour over confectioners sugar in a large mixing bowl. Beat until smooth; pour into an 8×8 inch dish lined with tinfoil and buttered. Chill until firm and cut into squares.


Thursday, December 13, 2012

12 Days of Christmas Baking - Day 8 Cake Truffles

Cake Balls, or as I call them Cake Truffles are all the rage these days. I'm not sure if she made them famous, but Bakerella sure is well known for them. Her website is loaded down with her Cake Ball and Cake Pop creations. Everywhere I turn I see Cake Truffle related goodies, whether it's a Cake Pop maker, Cake Ball/Pop molds, kits, you name it it's out there.

I just love the things, I make them if I am going to a holiday party. I make them for any kind of party really. I have even been know to give them as party favors. Cake Truffles take only a few ingredients and are rather simple to make. I will admit they can be a bit messy, but my philosophy has always been, "If you aren't making a mess in the kitchen you aren't doing something right." Or at the very least you're not having nearly as much fun as you could be. The only thing that seems a little crazy to me my first time making these was that you bake a cake (using cake mix) then you basically destroy it by turning it into crumbs. After I tasted one I totally forgot all about that and never gave it a second thought.

The real beauty of these, other than the deliciousness is that the flavor combinations are pretty much only limited to your imagination. And, if you are an artistic person you can turn these into little works of art. I've seen them shaped into different objects, including animals. Just google it and you'll see what I mean.


Cake Truffles

A tasty treat perfect for gift giving, handing out as party favors, or just because.

Yield: 3 dozen

Ingredients

  • 1 (18.25 oz) box cake mix, flavor of your choice
  • 1 (16 oz) container prepared frosting, flavor of your choice
  • 1-2 lbs candy coating (start with 1 lb and melt more if needed)

Cooking Directions

  1. Prepare the cake mix according to package directions using any of the recommended pan sizes. When cake is done, crumble while warm into a large bowl, and stir in the frosting until well blended. (I use a 9x13 baking dish and mix the crumbled cake with the frosting in the pan.)
  2. Melt candy coating in a glass bowl in the microwave, or in a metal bowl over a pan of simmering water, stirring occasionally until smooth.
  3. Use a melon baller or small scoop to form balls of the cake mixture. Dip the balls in melted candy coating using a toothpick or fork to hold them. Place on waxed paper to set.
  4. Note: I recommend chilling the cake truffles prior to dipping to ensure easier handling.

Monday, December 10, 2012

12 Days of Christmas Baking - Day 5 Gingerbread

Once the Halloween decorations are taken down and we start talking turkey my food cravings change, as do my baking habits. I begin to crave warm, hearty stick to your ribs comfort foods even more than usual. And I put the chocolate chip cookie recipe aside for a while. I put the brownie and cupcake making on the back burner momentarily, and I start making Spicy Gingersnaps, soft and chewy they are sooo good! Come Thanksgiving and my house is filled with the wonderful smell of sweet potato pies. And lest we not forget my famous no-bake oatmeal cookies aka boiled oatmeal cookies.

There's always a batch of gingerbread or two in there somewhere. I don't have a tried and true recipe yet so I usually go with my standby, Old Fashioned Gingerbread, which I got from allrecipes.com quite some time ago. Overall I am pretty pleased with the recipe. It makes a nice moist gingerbread with a good flavor. I prefer my gingerbread with lemon sauce, but I haven't found a recipe for that I love yet, so when I bake it I usually eat it straight up, or with a little powdered sugar sprinkled on top to purdy it up.


Old Fashioned Gingerbread

1/2 cup white sugar
1/2 cup butter
1 egg
1 cup molasses
2 1/2 cups all-purpose flour
1 1/2 teaspoons baking soda
1 teaspoon ground cinnamon
1 teaspoon ground ginger
1/2 teaspoon ground cloves
1/2 teaspoon salt
1 cup hot water

Preheat oven to 350 degrees F (175 degrees C). Grease and flour a 9 inch square pan.

In a large bowl, cream together the sugar and butter. Beat in the egg, and mix in the molasses.

In a bowl, sift together the flour, baking soda, salt, cinnamon, ginger, and cloves. Blend into the creamed mixture. Stir in the hot water. Pour into the prepared pan.

Bake 1 hour (I found mine was done after baking for approximately 35 minutes.) in the preheated oven, until a knife inserted in the center comes out clean. Allow to cool in pan before serving.

Wednesday, November 7, 2012

Baked Chocolate Donuts For National Donut Day

From Roots And Renovations

Monday morning I discovered that November 5th is National Donut Day, so I was inspired to break out my adorable little Sunbeam Donut Maker and get to baking. As a food lover I think all these National such and such days are pretty cool. They're just a fun and guilt-free excuse to eat some of your favorite foods. After all, if it's a national holiday the fat and calories don't count right?
From Roots And Renovations

My Big Bad Dad gave me my donut maker for my birthday this year and I love it. I was born and raised in the land of the best donuts EVER aka Krispy Kreme and although Krispy Kreme donuts these are not, they're still pretty darn good, and don't induce nearly the amount of guilt. And, thankfully they don't have that melt in your mouth quality that Krispy Kremes do because let me tell you, I could eat about six of their glazed donuts and not bat an eye. Actually, I think I have done that. Fortuntely it was a one time thing or I'd be wider than the Hot and Now sign we Krispy Kreme fans love to see all lit up in the window as we're driving by.

So, back to these donuts I made. They are made with cake mix, which makes them super easy, and they take about 5-7 minutes to make. I when I was first discovering the joys of my donut maker I figured there had to be a recipe out there that used a shortcut such as cake mix so I googled it and sure enough, I found a recipe at Cookie & Cups. The original recipe is for double glazed funfetti donuts and uses a donut pan, so I changed it up slightly. Also, I haven't tried the double glazed method yet, I dip mine in melted candy coating, also known as candy bark. Both chocolate and vanilla candy bark are equally tasty with the chocolate donuts. This go round I used vanilla because I had some leftover from another creation.

From Roots And Renovations
If you aren't familiar with candy bark, you can either find it in the baking aisle near the chocolate chips or in a craft store, such as Michael's. It should be with the cake decorating goodies. When I buy it in the craft store in comes in a bag, but in the grocery store I always find it in a cellophane wrapped trays. If you're using the kind in the bag, start out with about half the bag. Pour it into a microwave safe bowl and heat at 30 second intervals until melted completely, stirring in between. The bark that is packaged in the trays comes in cubes that are about the size of two ice cubes. If you're using the cubes, I recommend starting out with three to four cubes and follow the same heating directions. If the bark starts to harden before you are finished dipping all your donuts don't worry, just pop it back in the microwave. Remember to heat in 30 second intervals and stir frequently.

I like to use the candy bark as opposed to chocolate or white chocolate chips because it's pretty much fool-proof and not nearly as likely to seize up the way that chocolate or white chocolate will if you aren't careful. Plus, the stuff always hardens like it's supposed to.

Easy Baked Devil's Food Donuts

Delicious, super easy and healthy baked donuts using a donut maker.

Prep time: 5 minutes

Cook time: 5-7 minutes

Total time: 30 minutes

Yield: 18 donuts

Ingredients

  • 2 3/4 cups Devil's Food cake mix
  • 3/4 cup buttermilk
  • 2 eggs
  • 2 tablespoons butter, melted
  • cooking spray

Cooking Directions

  1. Whisk together buttermilk and eggs.
  2. Pour into a medium bowl with cake mix and melted butter.
  3. Stir vigorously until all ingredients are completely incorporated.
  4. Spray preheated donut maker with non-stick cooking spray.
  5. Spoon batter into each donut mold, careful not to overfill. Batter should just fill each mold, even to the top of the mold. (Make sure that you do not overflow into the center of each mold.)
  6. Bake for 5-7 minutes.
  7. Remove to cooling rack and repeat with remaining batter.

Wednesday, October 31, 2012

A Family Tradition: No-Bake Peanut Butter Oatmeal Cookies


Growing up I could always tell when it was getting close to Christmas because my Nana would whip up a batch or two of her famous No-Bake Oatmeal Cookies. They are outta this world and not like anything else I've ever tasted. I would venture to say that many people reading this probably have never had a cookie quite like this. They're BOILED not baked. Yup, you read that right, they're boiled! They are totally simple, with just a handful of everyday ingredients, things that you probably already have in your kitchen. This is a very unassuming, unsophisticated cookie, but gosh I could eat myself sick with these babies. And yanno what?? Tummy ache and all I would still be the happiest girl you've ever seen, they are that delicious!

The cookies contain no flour, the base is peanut butter and oatmeal, and seems extremely simple, but I won't lie, you either have the knack for making these or you don't. If you do count yourself blessed and know that it really is simple.

I've always been the baker in my family and I tried for years and years to make these cookies, usually failing miserably. They would always taste wonderful, but the consistency was wrong, they just wouldn't set up and you'd end up eating them with a spoon. It's totally unexplainable, the same ingredients, the same cooking time, except it seemed like the magic was missing. A few years ago though, I finally beat my struggles & knock on wood I got the hang of it. I've had a batch or two since then that stayed more soft, eat em with a spoon than should be, but usually they harden into those delicious little cookies I remember from my childhood.

So I challenge you, no better yet I encourage you to try these cookies out & let me know how you do. I would love to know if you enjoy these cookies as much as my family does. Around here we're split down the middle in regards to the addition of cocoa powder. They're great either way and no changes are needed if you want them sans chocolate.

Boiled Cookies

2 c sugar
1 stick butter/margarine
1/4 c cocoa powder(optional)
1/2 c milk
1 tsp vanilla
1/2 c peanut butter, chunky or smooth
2 1/2 c oatmeal
Mix and boil sugar, butter/margarine, cocoa & milk for 1 minute. Remove from heat, add vanilla, peanut butter, oatmeal & nuts. Mix well. Spoon by spoonfuls onto wax paper.
*Work quickly as mixture will start to thicken in a hurry.
I've tried both quick-cook and old fashioned oatmeal with these cookies and been sucessful & unsucessful with both. So I guess it's a toss up. I used old fashioned this year.

Sunday, October 28, 2012

Crescent Cinnamon Rolls

Are you like me and love crescent rolls AND cinnamon buns?  If so you've gotta try Crescent Cinnamon Rolls.  They are as easy as they are delicious.
I found the recipe recently via the lovely and highly addictive Pinterest. The recipe comes from The Hungry Housewife, which from the little bit of time I've peeked around looks like a cute blog with some tempting recipes.  The Crescent Cinnamon Rolls literally took me minutes to make, and only needed to bake for 10-12 minutes.  The icing that is drizzled on top took less than a minute to make and totally put these babies over the top.  

From Roots And Renovations
So far I've managed to use restraint and have only eaten half of one, I generously shared the other half with my Picky Eater aka my Big Bad Dad.  He's not one to rave over anything, but I took the fact that I heard not one word of complaint to mean that he enjoyed his share.  My half was still warm when I took that first bite of gooey, buttery, sweet deliciousness, and all I could think was "These will be SO good tomorrow for breakfast with a cup of coffee."  I'm not even a morning person and I'm looking forward to the A.M. because of today's creation.  

I'm betting you have everything on hand to make these except maybe the crescent roll dough, and I urge you to grab your keys now and go pick some up so you can make these already!  Don't just take my word on how good these are, try them yourself and let me know what you think.


Crescent Cinnamon Rolls

Prep time: 5 minutes
Cook time: 10-12 minutes
Total time: 30 minutes
Yield: 8
Ingredients
  • 1 tube (8 count) Crescent Rolls, unrolled and seperated
  • 5 tablespoons butter, softened
  • 1/4 cup granulated sugar
  • 2 1/2 heaping teaspoons cinnamon
  • 2 tablespoons butter, melted
  • 1/4 cups + 2 tablespoons confectioners sugar
  • 1/2 teaspoon vanilla extract
Cooking Directions
  1. Preheat oven to 375 degrees.
  2. In a small bowl, mix filling ingredients together until completely combined.
  3. Evenly spread the filling mixture over the unrolled crescent triangles and roll up.
  4. Place tip side down on a rimmed baking sheet lined with parchment paper or aluminum foil and bake for 10-12 minutes until lightly golden brown.
  5. Remove from oven and place on a cooling rack. (I recommend leaving the rolls on the foil or parchment and transferring the whole thing to the cooling rack.)
  6. Combine glaze ingredients together and using a spoon drizzle over rolls.

Share

Twitter Delicious Facebook Digg Stumbleupon Favorites